


Fishing the sliding float rigWhen it comes to using a sliding float the world has changed in the past few years. Using the new floats available has brought back this very effective method of float fishing. How Does It Work ?We will go through the workings of the traditional method first, because although most people opt for the new floats and their method, there is still a need to know the traditional method. The time may arise when you don't have a locslide or Polaris with you and find yourself in deep water.If you don't feel you need to know this method, then you can skip it, but if you are stuck one day with no Locslide or Polaris floats don't blame me. The traditional sliding rig works because it enables the float to slide up and down the line by virtue of either one eye (a waggler float for still or slow water) or two eyes (a balsa float for fast flowing water). When you are casting the float hangs only a few feet above the hook, prevented from sliding all the way down by shot. In the water, the shot pulls the line through the eye or eyes until the float is cocked by a Stop Knot tied on the line at the desired distance from the hook � usually the full depth of the swim. When Do You Use It ?The most common misunderstanding about when to use a sliding float rig is that you only fish it when the water is deeper than the length of your rod. If you have a 13ft (3.9m) rod, you might try to fix a float 13ft (3.9m) from the hook, but you may well find it extremely difficult to cast. Just remember if you feel comfortable, you will perform better. So if you have to tackle with a swim that is 10ft (3m) or more, consider using it.Which One To Use And What Rig To Use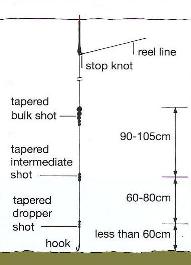 As we said earlier there are 2 different ways to attach a float on a sliding float rig.
Firstly with a single eye at the base of the float. This is a Waggler Float and you would use this for fishing still or slow flowing water. There are basically 2 fishing rigs for this method, which one you use depends on the direction of the wind. The fishing rig shown on the right is the prefered choice of sliding float rig if the wind is coming from behind you. Note that behind you in this case means - visualise yourself standing on a clock face at 6 o�clock, and you want to cast to 12 o�clock. If the wind is blowing from any point from 6-3 or 6-9 o�clock, then regard it as being from behind and use the rig on the right. 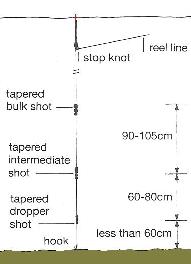 If the wind is blowing from any point from 12-3 or 12-9 o�clock, then this is a facing wind and use the rig shown on the left.
The main difference in the 2 rigs is that if you are casting into the wind, you will need more intermediate and dropper shot to avoid tangles when you cast. Taper shot size and spacing�s towards the hook. Whereas if the wind is behind you the less intermediate and dropper shot you need � down to one of each, even. Always taper shot size and spacings towards the hook. 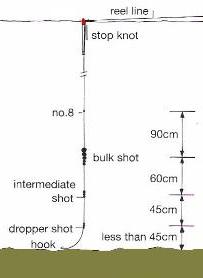 The other method to use for sliding float fishing is if there are 2 eyes on the float - one top one bottom. This is a balsa float. The main rig for the type is on the right. As you can see the shotting on all the sliding float rigs are similar, the only difference being on the balsa rig, the addition of a small shot above the bulk, to keep the float and bulk apart during the cast. This is essential whenever you use a float attached top and bottom, otherwise the hook tends to wrap itself around the top. You know which float you are going to use and which way the wind is blowing you can put the shot on. Follow this sequence and you will be up and running ing no time.
Now note the length of line between the hook and the dropper shot. If you want the hookbait to trip along the bottom of the swim, move the stop knot down the line by the length you noted above. If you want to fish the hookbait overdepth, move the stop knot down about 2/3 of the length noted above. Bites On The Drop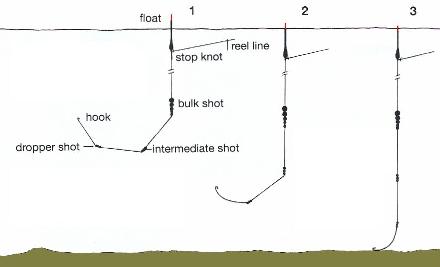 Due to the fact that the float cocks in three definite stages you can spot bites on the drop. This is what you have to do.
The New MethodThese new sliding float methods have opened up this method of fishing again. The simple set up means that anyone can fish deep waters and not get in a tangle. How do they work?There are two new types of float available -
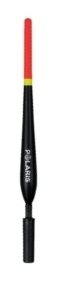
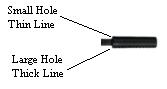
How Do they workThe Locslide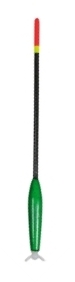 With the Locslide float you pass the line through the plastic fitting at the bottom of the float The Polaris FloatThis float has two holes of different sizes in the bottom of the stem when you have cast out, keep the line tight until the weight/feeder hits the bottom, keep your rod low to the water and pay out line until the float breaks surface and lies flat, put your rod on the rests, setting them up so the tip of the rod is in the water, then slowly reel in the line until the float cocks and start to go under again the more you tighten up. You are now set. When it comes to re-casting, hold the weight/feeder, let the line go slack and the float will fall down the line to the weight/feeder, this will make casting easier. Some FAQ's about these sliding floatsHow far from the hook to put the weight/feederThat depends on the water you are fishing and the fish you are trying to catch. A good starting length is between 12 to 18 inches. You can adjust it from there to improve your results. Will these sliding floats register lift bites?Yes is the answer, these floats will register lift bites very well. Due to the way these floats are fished they will show lifts better than normal floats. Can you have problems reeling in with a fish on?Due to this type of sliding float finding its own depth - which could be very deep, and because it locks its self you may find that the float will be up to the tip ring well in advance of the fish getting in a position where you could land it, if this is where you find yourself, simply keep winding and the line will pass through the float. Alternatively if you can ease the pressure on the float it will just slide back down the line to the weight. 
Custom Search
Back to Sliding float Top Back to Fishing Rigs Back to Home
|
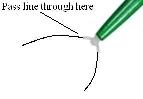
 , you pass your reel line through the hole from the top down and attach your weight/feeder to your reel line as normal.